이번 글에서는 저번 글에 이어서 회원관리 기능의 HTML 화면들과 H2디비를 연결하여 보겠습니다.
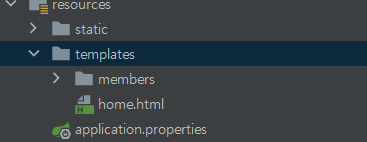
먼저 resource내부의 구조는 아래처럼 구성하겠습니다.

home.html를 만들어 줍니다.
<!DOCTYPE HTML>
<html xmlns:th="http://www.thymeleaf.org">
<body>
<div class="container">
    <div>
        <h1>Hello Spring</h1>
        <p>회원 기능</p>
        <p>
            <a href="/members/new">회원 가입</a>
            <a href="/members">회원 목록</a>
        </p>
    </div>
</div> <!-- /container -->
</body>
</html>
member폴더 안에 createMembersForm.html 생성하여 줍니다.
<!DOCTYPE HTML>
<html xmlns:th="http://www.thymeleaf.org">
<body>
<div class="container">
 <form action="/members/new" method="post">
 <div class="form-group">
 <label for="name">이름</label>
 <input type="text" id="name" name="name" placeholder="이름을
입력하세요">
 </div>
 <button type="submit">등록</button>
 </form>
</div> <!-- /container -->
</body>
</html>
마지막으로 memberList.html를 만들어 줍시다.
탬플릿 엔진은 타임리프를 사용하였습니다.
프로젝트 생성 시 라이브러리를 받아서 사용하시면 됩니다. itmoon.tistory.com/39
스프링부트(Spring-boot) 프로젝트 생성 및 설정
안녕하세요 이번 글에서는 Sprnig-boot를 이용하여 프로젝트를 생성하고 간단하게 실행시켜 보겠습니다. (Spring-boot 관련 글에서는 inteliJ를 사용합니다) 먼저 아래의 링크로 들어가 줍니다. https://sta
itmoon.tistory.com
<!DOCTYPE HTML>
<!--타임리프 템플릿 엔진을 사용하기 위해 선언하여 줍니다 -->
<html xmlns:th="http://www.thymeleaf.org">
<body>
<div class="container">
    <div>
        <table>
            <thead>
            <tr>
                <th>#</th>
                <th>이름</th>
            </tr>
            </thead>
            <tbody>
            <tr th:each="member : ${members}">
                <td th:text="${member.id}"></td>
                <td th:text="${member.name}"></td>
            </tr>
            </tbody>
        </table>
    </div>
</div>
</body>
</html>
이제 application.properties에 디비 연결을 설정하여 줍시다.
spring.datasource.url=jdbc:h2:tcp://localhost/~/test
spring.datasource.driver-class-name=org.h2.Driver
spring.jpa.show-sql=true
spring.jpa.hibernate.ddl-auto=none
spring.datasource.username=sa
H2 메모리 디비를 사용하였습니다 설치방법을 모르시는 분들은 아래 링크를 참고하여 주시고 메모리 디비를 실행시킨 상태에서 프로젝트를 테스트하시면 됩니다.
스프링부트(Spring-Boot) - h2 메모리 DB 사용하기
안녕하세요 이번 글에서는 h2 메모리 DB를 해보도록 하겠습니다. 먼저 아래 링크로 접속하여 줍시다! H2 Database Engine H2 Database Engine (redirect) H2 Database Engine Welcome to H2, the free SQL databas..
itmoon.tistory.com
감사합니다 ^^
'Spring & Spring Boot' 카테고리의 다른 글
| [ Spring-Boot ] Scheduler 사용하기 (0) | 2021.05.19 |
|---|---|
| [ JWT(Json Wen Token) ] 이란 무엇인가? (0) | 2021.04.17 |
| 스프링부트(Spring-Boot) - [ 회원관리 1편 ] (0) | 2021.01.23 |
| 스프링부트(Spring-Boot) - h2 메모리 DB 사용하기 (0) | 2021.01.23 |
| 스프링부트(Spring-boot) 프로젝트 생성 및 설정 (0) | 2021.01.13 |